Now that we've covered how HTTP messages work and how to generate requests and responses in JavaScript, let's talk about the real world applications of using HTTP in your web app. This part of the series will cover evaluating APIs other people have built and getting their data on your page. I'll be covering authentication in part 5.
Introduction and Table of Contents
This blog assumes you've read the first three parts of the series or are familiar with basic command line, async Javascript, and HTTP messages. You can view all of the code for this series in the Github repository.
SOAP and REST
You will come across the terms SOAP and REST a lot when evaluating APIs. SOAP and REST are guidelines/designs/architectures for building a web messaging API. There are more acronyms for API designs out there, but you'll see these two the most often. In JavaScript web applications, you'll usually be working with REST APIs. Rather, you'll be working with other developers' implementations of REST architecture. I'm going to briefly describe SOAP and REST, but you'll be able to interact with APIs without knowing all of these rules off the top of your head.

Before Microsoft proposed SOAP around 1999, the main web messaging option involved binary messaging. SOAP stands for Simple Objects Access Protocol and uses XML. It has a strict set of rules about how to build a web messaging service. It provides it own headers, Web Services Addressing (providing alternatives to using a URL), message structure rules, encoding rules, and a convention for requests and responses. It is very standardized. The main benefit of using SOAP is you can use it anywhere - any programming language or protocol (HTTP, SMTP, TCP, UDPREST).
REST, on the other hand, is more flexible and less involved to set up. While SOAP allows for any messaging protocol, REST requires you to use HTTP. It also supports using any media type in your HTTP messages, not just XML. Proposed in 2000 by Roy Fielding, REST stands for REpresentational State Transfer. An API built following REST is called a REST API or RESTful API.
There are 6 guiding principles to follow when designing a REST API:
- Client-server design with requests made through HTTP
- Uniform interface
- Stateless
- Cacheable
- Layered System
- Code on Demand (optional)
The client-server design pattern enforces separation of concerns. If the interface the user interacts with is separate from the data storage, portability and scalability are increased. Stateless just means nothing about the client is stored in the server after a request. Cacheable requires the server to indicate if the data in the response is cacheable (e.g. if it will continue to be accurate or expire). Layered System requires that the server be designed using hierarchical components that are separated by function. Code on Demand gives the option for the API to send back executable code to extend client functionality.
The uniform interface principle has a bit more to unpack. It requires that the server sends back representations of its resources with enough information for the client to be able to process it. Its resources must be able to be manipulated by the client via that representation. The client should be able to use hyperlinks to find all the ways it can interact with the server.

How to Find APIs
There are many lists of free APIs you can use:
You'd also be surprised how many big sites and games offer APIs:
- Ravelry (requires a login)
- Google Maps
- Spotify
- Yahoo Finance
- PokéAPI
- IMDB API
When in doubt, Googling "free APIs" and your project idea summed up in one or two words will probably yield multiple results.
Evaluating APIs
When evaluating any software tool it is recommended that you consider a few things: community, support, and documentation. Community refers to the developers using the tool - are they posting common questions and getting responses? This comes in handy when you're troubleshooting. Support means the owners of the tool are still active - answering questions, developing updates and security patches, and more. Seeing "deprecated" in a Github repo or the documentation means it is no longer supported. Documentation is important, especially when you don't own the source code or have a relationship with the person who does. It is ok to take a look at the documentation, see that it's bare or confusing, and choose not to use the tool because of it. Many a senior developer would call that wise.

Let's look at a few things you'll want to see when you pull up an API's documentation:
Do they explain all the possible endpoints?
- Take, for example, Dog API's docs. You can look at each endpoint and assess whether it will give you the data you'll need.
Is the data returned in a format you can use?
- The Dog API returns a JSON body, which we can easily use in our JavaScript app and server.
Do they have limits on the number of requests?
- Check out the Shutterstock API's responses section of their docs. The free tier of Shutterstock API limits a developer to 250 requests per minute. While this probably isn't a problem for a side project that won't get much use, some API limits are much stricter.
Do they require signing up or authentication?
- Typically, if an API requires a login or the documentation references a key, you'll have to go through a signup process, get a key, and pass that key in your headers. I'll cover this process and the common types of authentication in part 5.
Do you have time to get this tool set up and working?
- Evaluating documentation is also an opportunity to decide if there are too many requirements for you to use it in your current project. If you're on a deadline or just trying to build a sample app, you probably don't need to spend a ton of time getting one tool to work. With so many free APIs, there's almost always an alternative tool that might require less work.

I'm not saying don't challenge yourself or abandon your idea, just be nice to yourself if you're already under pressure. For example, figuring out the OAuth2.0 authentication for the Ravelry API took me a month of beating my head against a wall in my free time during bootcamp. Luckily, I figured it out just before we had a week to build the project that needed it. I know plenty of people who abandoned using the Spotify API for bootcamp projects because of its learning curve. You can see in the getting-started guide it requires not only authenticating your app but also the user and other concepts besides. If you just wanted information about songs, you could use the last.fm API that only requires authenticating the app instead.
Error Handling
Up until now, we've know what to expect, so how to write our request code has been clear. However, unless you have access to the source code for the API you're using or they have the most beautiful, detailed documentation known to man, you can't always anticipate what you're going to get back from a request. Furthermore, HTTP has a lot of async moving parts, which can lead to some very confusing troubleshooting. Plus, we haven't written any code to handle unexpected errors. Let's discuss how to catch errors and then some of the common troubleshooting scenarios you may run into.
Gotta Catch 'em All
In part 3, I mentioned that in a code block like this:
function getRequest() {
    fetch("http://localhost:8080/yarn")
    .then(response => response.json())
    .then(data => console.log(data))
    .catch(error => console.log(error))
  }
.catch() is there to handle errors from the fetch() function. For example, if I passed a string that wasn't a URL or the server isn't on to receive requests, that .catch() would log the resulting error to the console.
What about errors that are in the HTTP response message? We have to handle those ourselves. We're looking to:
- Prevent the app from stopping completely because of an unhandled error in the code that handles the data.
- Provide something to display to the user if we don't get the data we need from the API.
There are many ways to do this. You'll want your code to check the response's status code and body for an error. To start, you can have placeholder data displayed until you get and check the response. You can also use a state variable called loading and code that displays a loading graphic when it is set to true. After you get and check the response, you'll set loading to false, and display an error or the data. If you're displaying data specific to a user, like on a homepage, think about what happens if they just made an account and haven't added any data yet. Any way you want to go about it, just be sure to anticipate an HTTP request failing and provide fallbacks.
Do they allow CORS?

CORS is most likely the first error you'll see if you're going to see it. Remember you can't check this with Postman or in the browser! Earlier in this series, I explained CORS pre-flight requests. What I didn't mention is that some requests are considered simple requests, and also don't trigger CORS checks. A simple request must use the GET, HEAD, or POST method. (The HEAD method requests headers from the resource.) The request can only use four CORS-safelisted headers - Accept, Accept-Language, Content-Language, and Content-Type. The body must have a MIME type of application/x-www-form-urlencoded, multipart/form-data, or text/plain. The request cannot have a ReadableStream object, a feature of the Streams API. Since we're usually using JSON in JavaScript web apps, this may not be an issue, but it is something to consider when testing if an API allows CORS.
To check if CORS is allowed, I build a GET request to an API using axios in my client first. When I run it, I get this error in the DevTools console:

This means this resource doesn't allow CORS. Specifically, when the browser ran a pre-flight request, the API response didn't have an Access-Control-Allow-Origin header, so it's not accepting requests from other origins.
The resource will, however, accept requests run from outside the browser, like from a server. I used axios because I know I can copy and paste that request code into my Node.js server. So, when you see a CORS error, don't panic. You can always build the most basic of servers, like we did in part 2. All you need is one GET route that when called requests data from the API and then sends the data it gets back in a response.
Do they send back an appropriate error format?
Remember how I mentioned earlier that you'll be interacting with another developer's interpretation of a REST API? In part 1, I also pointed out that humans are determining what error code/message you get back in a response message. We saw what this means in practice in part 2. Other developers have even responded to blogs in this series making jokes about unstandardized error codes. When you start building requests to endpoints in someone else's API, you might start finding some interesting quirks in the errors you receive.
If there is no mention of errors in the documentation, you can make a few assumptions.
In general, 500 responses can mean literally anything. It could mean the server is down. It could mean they didn't anticipate a request like yours so there was an unhandled error. All 500 tells you is that the server borked/broke/gave up on life.

429 means you're being rate limited - check the documentation on how many requests are allowed, especially if you selected a plan. You'll probably just have to wait a couple minutes. You might have to look at the number of calls your app is making per minute.
404 is easier - it probably means your request URL is wrong. To complicate things a bit, it could also mean the route you requested information from is currently not accepting requests for several reasons. The former is more likely. The latter is for the owner of the server to troubleshoot.
401 and 403 are authentication and authorization, which we'll get into in part 5.
Until proven otherwise, always assume you can't trust a 200 status code. Too often, developers seem to think that if the HTTP request and response code work, that's not an error. They'll include the error message about why you didn't get the data you expected in the body. That message might tell you how to fix it.
Promises
Async functions return promises. Our HTTP requests are typically async because the client sending a request, the server processing the request, and the server sending a response takes time. If you are expecting returned data or a response message and instead see Promise <pending>, that means the function hasn't received a response. Once it has, it'll be Promise <fulfilled> or Promise <rejected>, but JavaScript won't have to tell you that. It'll just give you the data or an error respectively.
To fix this, use await or chain with .then(). You have to tell JavaScript to wait on that that response, or it's just going to treat it as synchronous, give you Promise <pending>, and move on to the next function.
Data Discovery
Let's say I want to make a component in my HTTP101 app that will display Studio Ghibli movies using the Studio Ghibli API. You can view all of the code in the Github repository.
Based on those docs, I know I want to make my request to the /films endpoint. To start, I make a new component file called Ghibli, import it into my index.js file, and add this code:
import React from "react";
import axios from 'axios';

function Ghibli() {

  function getRequest() {
    axios.get('https://ghibliapi.herokuapp.com/films')
    .then(response => console.log(response.data))
    .catch(error => console.log(error))
  }

  return (
    <button onClick={getRequest}>Get Ghibli!</button>
  )
}

export default Ghibli;
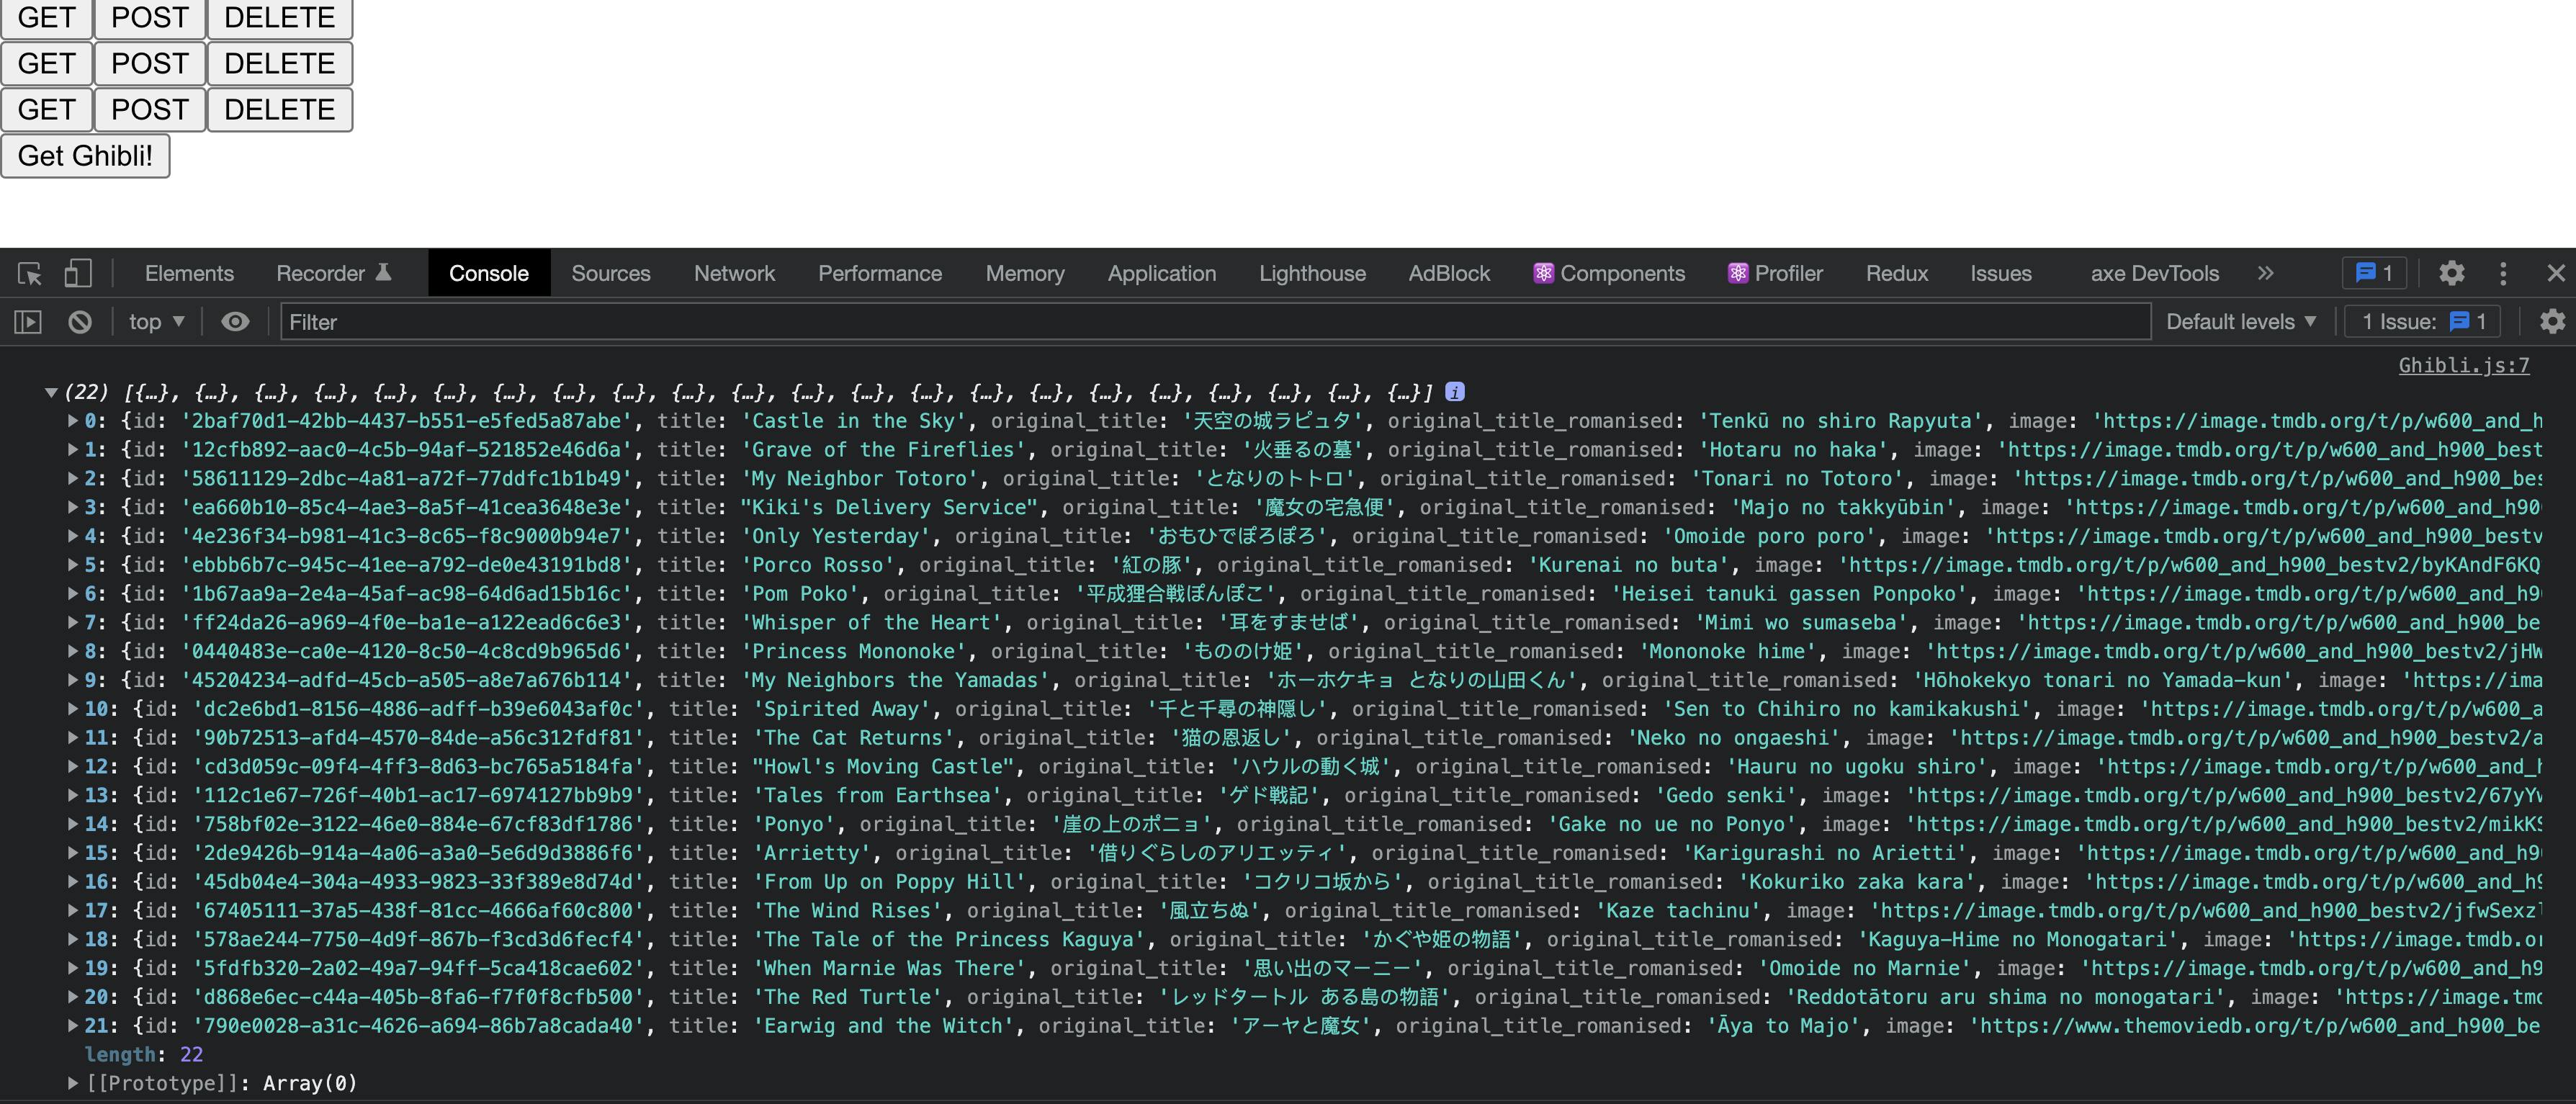
When I run it and click the button, the result looks like:

The Studio Ghibli API docs are great - you can easily see the response format you'll receive. However, you'll often see documentation that only includes the endpoints. So how do you go about getting data in an unknown format on the page?
There's a reason I've been using console.log in all of the requests in this series. Often you can't slap the data in a component to be rendered on the page to get a look at its structure. React screams when you try to use objects as children and if you haven't seen the response message structure, you're going to want the formatting provided by the DevTools console. Because I'm familiar with axios and it's in the documentation, I knew when writing the code my data would be in response.data. If I was using fetch, it'd be in response. Still, I console.log(response) every time I use a new resource just to see what I'm getting back.
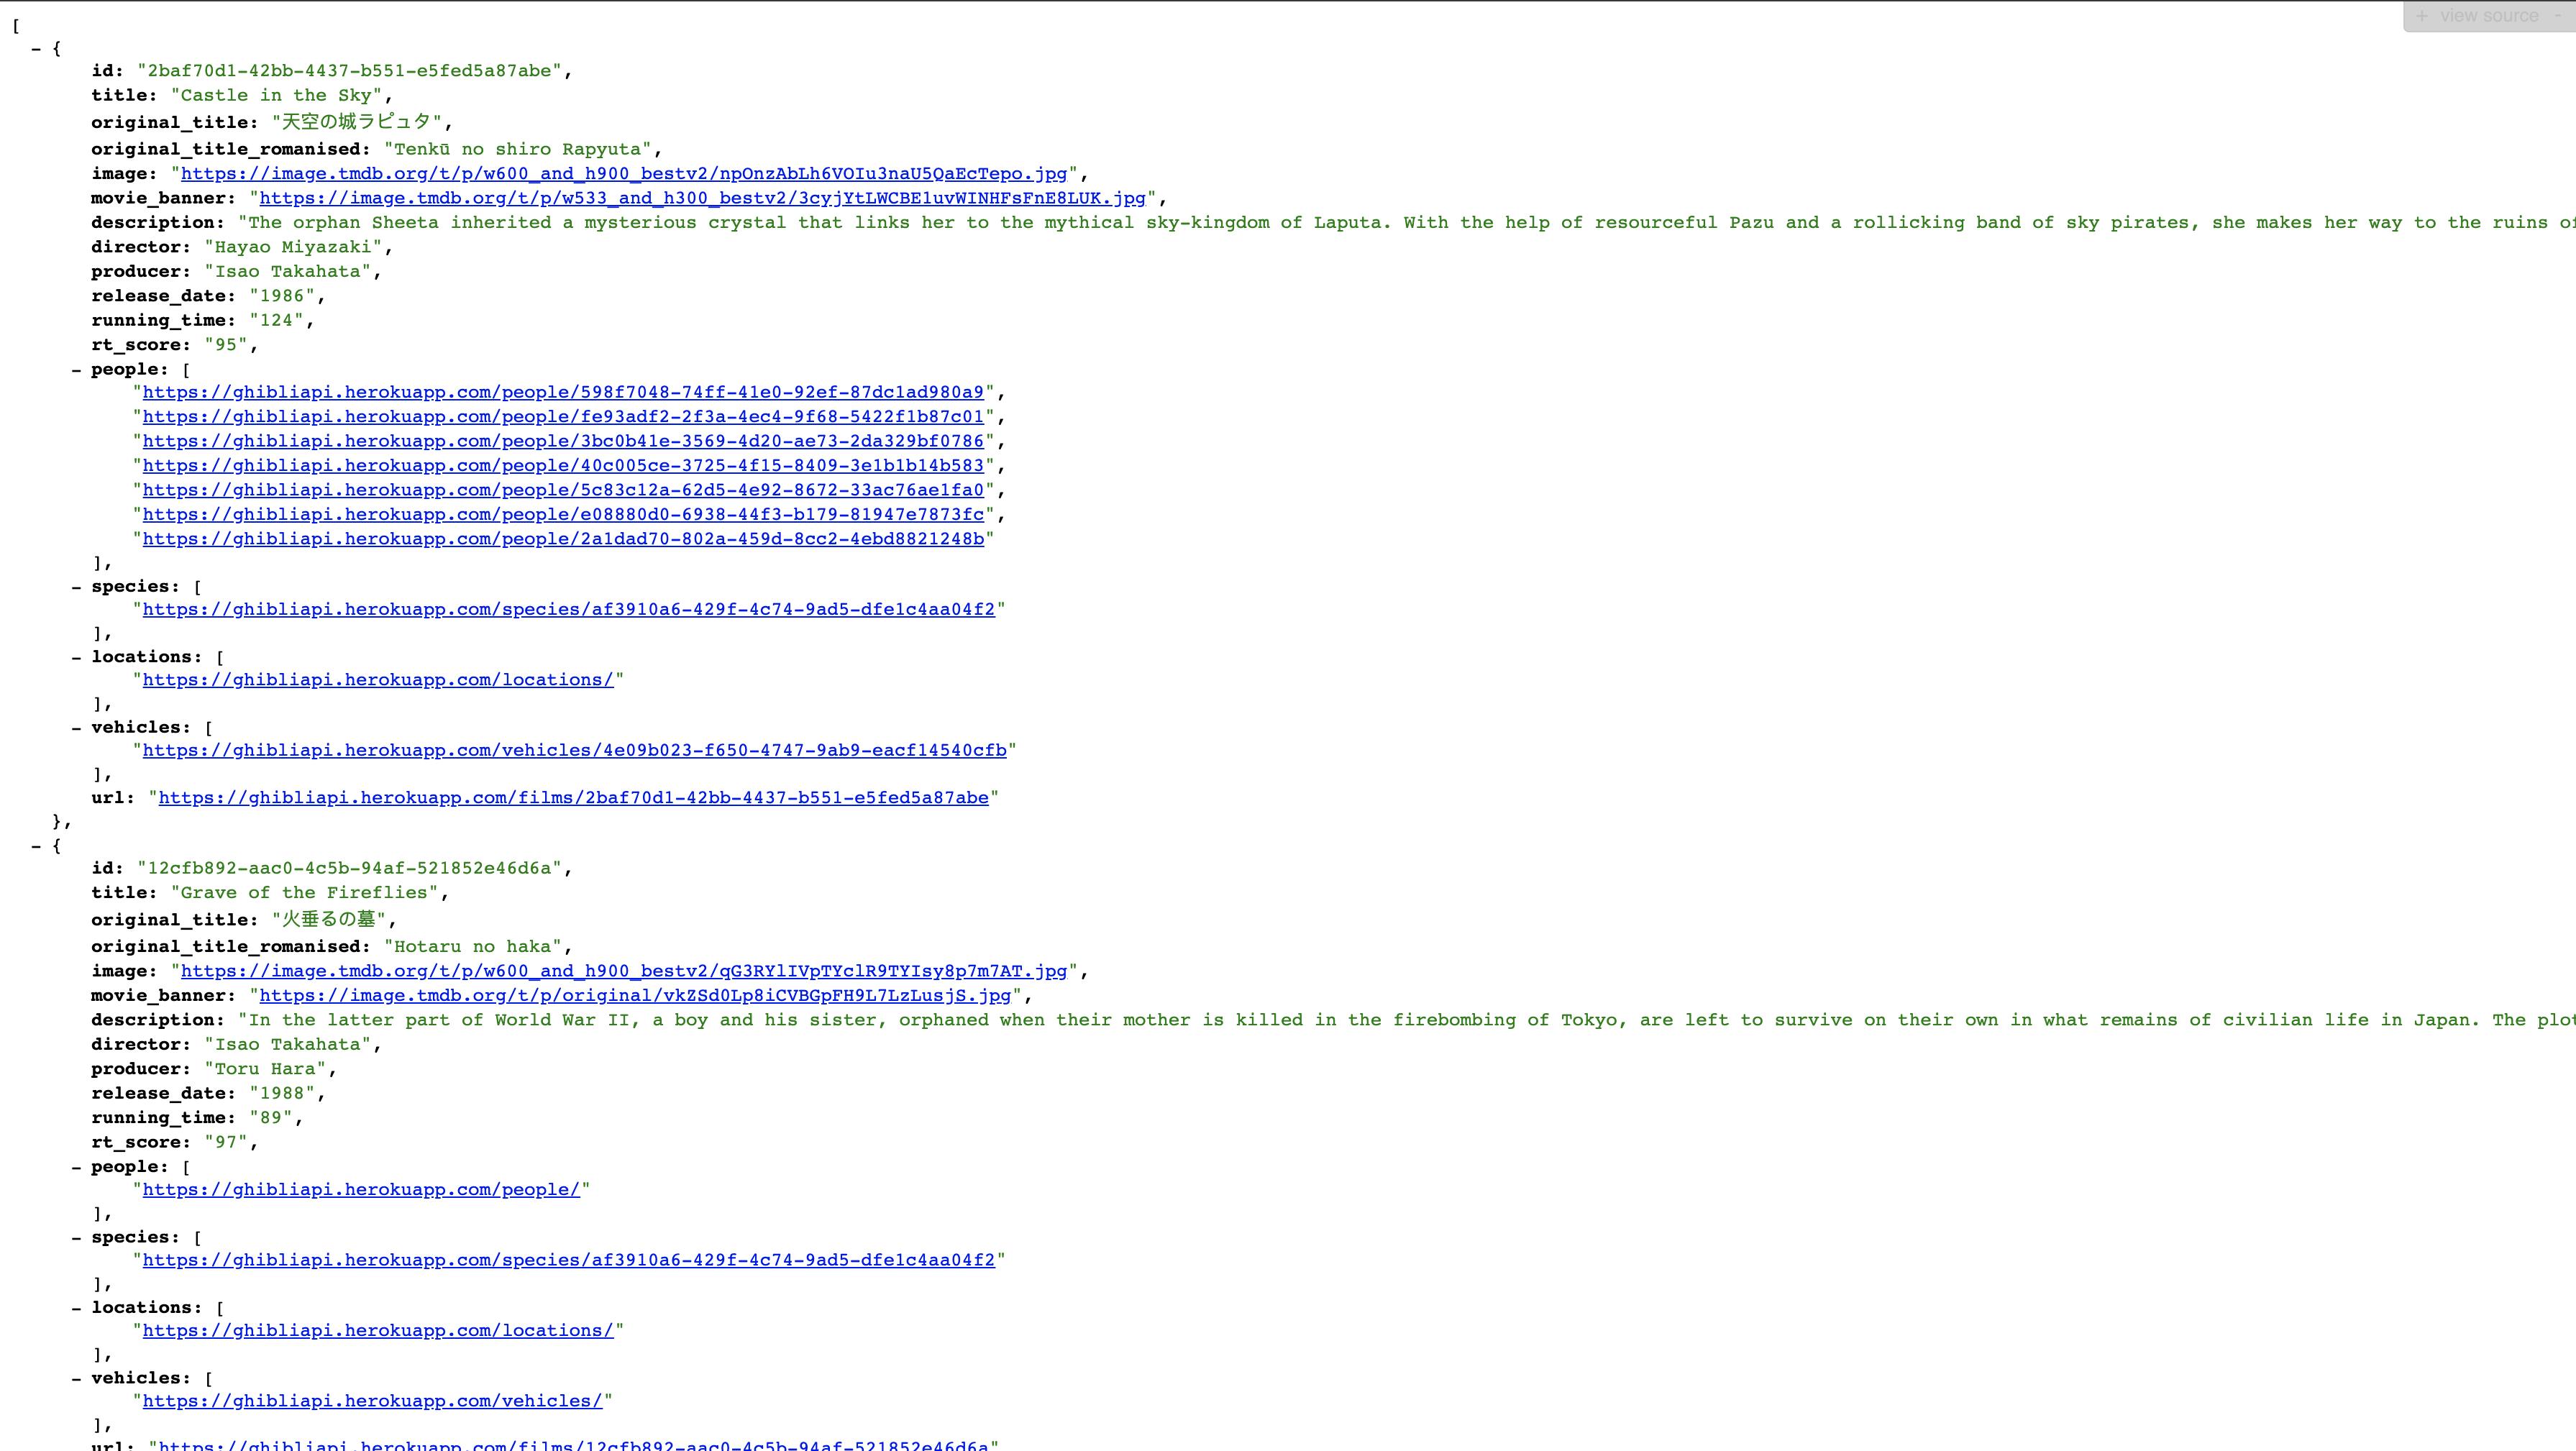
If I don't need to check out the whole response to find the field with my data, and it's just a GET request, I like to make those in the browser. You can get browser extensions geared towards making it easier to look at the structure of the data. For working in JSON, I use JSONVue Chrome extension.
When I navigate to ghibliapi.herokuapp.com/films in the browser, the same result looks like this, thanks to JSONVue:

You can even hover over an object or field name, and it will highlight it and its value.
Displaying Data
Now that our request is working and we have seen the structure of the returned data, we're ready to format it and display it on the page.
Looking at the data I got back from the Studio Ghilbi API, I start thinking about how I want to display each movie. We've got quite a few fields. I know I'll need the id if I'm displaying all the movies I got back - React requires key props in lists. I want to start with the title and original title in Japanese. Next, I'm choosing the movie banner over the regular image, and finally, I want to include the description. I can always add in more information later.
For one movie, I'm looking at JSX like this:
  <li key={id}>
    <h2>{title}</h2>
    <h3>{original_title}</h3>
    <img alt=`${title}'s movie banner` src={movie_banner}></img>
    <p>{description}</p>
  </li>
How do we go about formatting all of them at once?
array.map()
I mentioned React doesn't like objects as children, but it loves arrays, and using array.map(), you can turn your data into an array of HTML elements to be displayed.
To start, I define a films state variable using React's useState() hook. This creates a variable that any function in the same scope can access. React also listens for updates and will re-render the component when I use setFilms() to update the value. Then I updated the JSX in this component to return my button and a <ul> element. The <ul>'s children will be stored in films after my onClick handler runs.
  const [films, setFilms] = useState(null);

  function handleOnClick() {

axios.get('https://ghibliapi.herokuapp.com/films').then((response) => {
      setFilms(response.data.map((film) => {
        let altText = `${film.title}'s movie banner`;
        return (
          <li key={film.id}>
            <h2>{film.title}</h2>
            <h3>{film.original_title}</h3>
            <img alt={altText} src={film.movie_banner}></img>
            <p>{film.description}</p>
          </li>
        )
      }))
    })
  }

  return (
    <div>
      <button onClick={handleOnClick}>Get Ghibli!</button>
      <ul>
        {films}
      </ul>
    </div>
  )
When a user clicks the button, my onClick handler (aptly named handleOnClick) gets the films data from the Studio Ghibli API, runs it through a map function, and then sets the films state variable to the result. React then re-renders the component and we see a list of movies appear on the page! If this was an app I was going to deploy, I'd prevent the <ul> element from being rendered until I got the data back, but that's a React tutorial for another day.

Broken down a little further, the axios.get() function passes the response to .then(). .then() passes the response to the anonymous function I've written inside it. That anonymous function calls setFilms(), and within setFilms() I call response.data.map(). This is essentially films = result of array.map(). In this case, the array is response.data. To get our new JSX wrapped data, I pass response.data.map() this anonymous function:
(film) => {
        let altText = `${film.title}'s movie banner`;
        return (
          <li key={film.id}>
            <h2>{film.title}</h2>
            <h3>{film.original_title}</h3>
            <img alt={altText} src={film.movie_banner}></img>
            <p>{film.description}</p>
          </li>
        )
      }
map() passes my array of films in response.data to this function. This function says one item in this array is called film. Kind of like a for loop, map() runs each film in films through this function and after it finishes, returns a new array with all the results. Since template literal strings aren't allowed in JSX, I've broken out the image alt text into a variable that I can put in our new <li> before it is returned.
Don't worry if that's confusing - the next example is similar, but without as many async, anonymous, and callback functions.
Object Full of Objects
Sometimes the person writing the API isn't thinking about our desire to display their data in React - what if the API was returning an object full of objects instead of an array?
For this example, I'm going to make another component file called Objects, and import it into my index.js file. First, I add four movies from the data I got from Studio Ghibli, but in an object, not an array. A very small example, with most of the fields removed:
const films = {
  0: {
    id: "2baf70d1-42bb-4437-b551-e5fed5a87abe",
    title: "Castle in the Sky"
  },
  1: {
    id: "2baf70d1-42bb-4437-b551-e5fed5a87abe",
    title: "Grave of the Fireflies"
  }
}
The rest of the code looks like:
import React from "react";

function Objects() {

  const movies = Object.keys(films).map((film) => {
    let altText = `${films[film].title}'s movie banner`;

    return (<li key={films[film].id}>
        <h2>{films[film].title}</h2>
            <h3>{films[film].original_title}</h3>
            <img alt={altText} src={films[film].movie_banner}></img>
            <p>{films[film].description}</p>
    </li>)
  })

  return (
    <ul>
      {movies}
    </ul>
  )
}

export default Objects;
When that runs, I get a shorter list of movies that looks exactly the same as the previous map() example.
The difference here is we use Object.keys() to create an array of keys from films. Using bracket notation, we can access each film in films like films[0] for Castle in the Sky. The map() function iterates through the array of keys, and references the original object to get the fields we need. When the Castle in the Sky key is passed as film, the function uses films[0].id to get the id, and so on.
Conclusion
That was a lot! As always, let me know if you're left with questions. I wanted to cover the main pitfalls I've encountered and tricks I've learned consuming public APIs. As these topics get more advanced, it's harder for me not to turn this into a React tutorial. If you'd like more information on a topic I covered here, just let me know!
Up next, in part 5, I cover authentication, including more URL parameters!

